PWM on Beaglebone

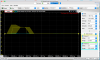
I am looking to use PWM on the GPIO pins. FreeBSD 10.x seems to offer sysctl settings for usage.
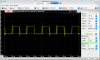
What is the mechanism for usage on FreeBSD 11.x ?
I am looking to drive an R/C servo.
Here are the BBB 10.4 settings:
Code:
root@beaglebone:~ # sysctl dev.am335x_pwm
dev.am335x_pwm.2.dutyB: 0
dev.am335x_pwm.2.dutyA: 0
dev.am335x_pwm.2.period: 1000
dev.am335x_pwm.2.freq: 100000
dev.am335x_pwm.2.clkdiv: 1
dev.am335x_pwm.2.%parent: simplebus0
dev.am335x_pwm.2.%pnpinfo: name=pwm@48304000 compat=ti,am335x-pwm
dev.am335x_pwm.2.%location:
dev.am335x_pwm.2.%driver: am335x_pwm
dev.am335x_pwm.2.%desc: AM335x PWM
dev.am335x_pwm.1.dutyB: 0
dev.am335x_pwm.1.dutyA: 0
dev.am335x_pwm.1.period: 1000
dev.am335x_pwm.1.freq: 100000
dev.am335x_pwm.1.clkdiv: 1
dev.am335x_pwm.1.%parent: simplebus0
dev.am335x_pwm.1.%pnpinfo: name=pwm@48302000 compat=ti,am335x-pwm
dev.am335x_pwm.1.%location:
dev.am335x_pwm.1.%driver: am335x_pwm
dev.am335x_pwm.1.%desc: AM335x PWM
dev.am335x_pwm.0.dutyB: 0
dev.am335x_pwm.0.dutyA: 0
dev.am335x_pwm.0.period: 1000
dev.am335x_pwm.0.freq: 100000
dev.am335x_pwm.0.clkdiv: 1
dev.am335x_pwm.0.%parent: simplebus0
dev.am335x_pwm.0.%pnpinfo: name=pwm@48300000 compat=ti,am335x-pwm
dev.am335x_pwm.0.%location:
dev.am335x_pwm.0.%driver: am335x_pwm
dev.am335x_pwm.0.%desc: AM335x PWM
dev.am335x_pwm.%parent:
 
Looking thru those overlays settings they look similar to settings I see from ofwdump on FreeBSD11.1 . I will have to go through them.

Do you know if the overlay method works on FreeBSD 11.x BBB or do I need to use -CURRENT ?
 
Unfortunately, I don't know.

I'm still hoping that the latest main stream u-boot can be used for FreeBSD, and it perfectly handles dtb(o)'s by itself.
I built u-boot 2018.01, but never had a chance to test it with FreeBSD.

Also, you can manually add the content of those overlays to the main dtb that you load, and recompile it. Of course, make sure that you don't use macros which are defined in that overlays project tree.
 
I could not get the overlay working but I used the information in the overlays to merge into a de-compiled am33x-boneblack.dts.
Then I hand applied some of the overlay and compiled it back into the dtb.
So I have ADC overlay and PWM working on FreeBSD 11.1 and with HDMI working. Nice.
I turned on every setting there is for pwm. I have no idea what ecap is.
Time to hit the books. Ti has some good docs.
Code:
root@BBB3:/boot/dtb # sysctl -a | grep pwm
dev.am335x_ehrpwm.2.dutyB: 0
dev.am335x_ehrpwm.2.dutyA: 0
dev.am335x_ehrpwm.2.period: 1000
dev.am335x_ehrpwm.2.freq: 100000
dev.am335x_ehrpwm.2.clkdiv: 1
dev.am335x_ehrpwm.2.%parent: am335x_pwmss2
dev.am335x_ehrpwm.2.%pnpinfo: name=ehrpwm@48304200 compat=ti,am33xx-ehrpwm
dev.am335x_ehrpwm.2.%location:
dev.am335x_ehrpwm.2.%driver: am335x_ehrpwm
dev.am335x_ehrpwm.2.%desc: AM335x EHRPWM
dev.am335x_ehrpwm.1.dutyB: 0
dev.am335x_ehrpwm.1.dutyA: 0
dev.am335x_ehrpwm.1.period: 1000
dev.am335x_ehrpwm.1.freq: 100000
dev.am335x_ehrpwm.1.clkdiv: 1
dev.am335x_ehrpwm.1.%parent: am335x_pwmss1
dev.am335x_ehrpwm.1.%pnpinfo: name=ehrpwm@48302200 compat=ti,am33xx-ehrpwm
dev.am335x_ehrpwm.1.%location:
dev.am335x_ehrpwm.1.%driver: am335x_ehrpwm
dev.am335x_ehrpwm.1.%desc: AM335x EHRPWM
dev.am335x_ehrpwm.0.dutyB: 0
dev.am335x_ehrpwm.0.dutyA: 0
dev.am335x_ehrpwm.0.period: 1000
dev.am335x_ehrpwm.0.freq: 100000
dev.am335x_ehrpwm.0.clkdiv: 1
dev.am335x_ehrpwm.0.%parent: am335x_pwmss0
dev.am335x_ehrpwm.0.%pnpinfo: name=ehrpwm@48300200 compat=ti,am33xx-ehrpwm
dev.am335x_ehrpwm.0.%location:
dev.am335x_ehrpwm.0.%driver: am335x_ehrpwm
dev.am335x_ehrpwm.0.%desc: AM335x EHRPWM
dev.am335x_ehrpwm.%parent:
dev.am335x_ecap.2.%parent: am335x_pwmss2
dev.am335x_ecap.1.%parent: am335x_pwmss1
dev.am335x_ecap.0.%parent: am335x_pwmss0
dev.am335x_pwmss.2.%parent: simplebus0
dev.am335x_pwmss.2.%pnpinfo: name=epwmss@48304000 compat=ti,am33xx-pwmss
dev.am335x_pwmss.2.%location:
dev.am335x_pwmss.2.%driver: am335x_pwmss
dev.am335x_pwmss.2.%desc: AM335x PWM
dev.am335x_pwmss.1.%parent: simplebus0
dev.am335x_pwmss.1.%pnpinfo: name=epwmss@48302000 compat=ti,am33xx-pwmss
dev.am335x_pwmss.1.%location:
dev.am335x_pwmss.1.%driver: am335x_pwmss
dev.am335x_pwmss.1.%desc: AM335x PWM
dev.am335x_pwmss.0.%parent: simplebus0
dev.am335x_pwmss.0.%pnpinfo: name=epwmss@48300000 compat=ti,am33xx-pwmss
dev.am335x_pwmss.0.%location:
dev.am335x_pwmss.0.%driver: am335x_pwmss
dev.am335x_pwmss.0.%desc: AM335x PWM
dev.am335x_pwmss.%parent: simplebus
 
On Beaglebone there are three PWM nodes {ehrpwm0, ehrpwm1, and ehrpwm2}, but two of them have an A and a B. There are restrictions on how the A and B can be used, such as they have to use the same frequency, but they can each have independent duty cycles.

I can only seem to get pwm1A(P9_14) pwm1B(P9_16) & pwm2A(P8_19) pwm2B(P8_13) working.
So I am going to rework my setup as pwm0 seems absent. 2 pairs of PWN pins to work with.

Getting PWM working takes modifying decompiled dtb settings from 'status=disabled' to 'status=okay'. That part from the overlays work.
It is the pinmux selection that deviates.

I am going to try and write a dtso that will work for FreeBSD to enable PWM1 and PWM2.

https://github.com/beagleboard/bb.org-overlays/tree/master/src/arm

I am pulling from both am33xx-pwm-00A0.dts and the newer overlays with seprate files for each pwmss- BB-PWM1-00A0.dts and BB-PWM2-00A0.dts
 
Yes and i noticed that FreeBSD source contains the C file for it.
/usr/src/sys/arm/ti/am335x/am335x_ecap.c

I noticed there is a GNU overlay for PWM-Timer. Need to do so research on that.
That's good it's already present and doesn't need yet to be imported from Linux.
I am still only reading around and preparing myself for the BBB things.

Will anyway have to wait with starting BBB playing until micro-HDMI->DVI cable, USB->SATA adapter and MAX-232 have arrived some day the coming week.

I found at the university junkyard a very nice and robust quality 5.25" FH external drive case with fan and PS 12V 5A and 5V 5A, providing a sweet cage for the Beagle protecting it from my cats.
And I am happy that I didn't yet carry that old 1280x1024 LCD monitor to the junkyard, as it seems the optimum for Beagle video output. :)

Looking forward to my first Beagle blinky :)
 
So I disabled ehrpwm0 because none of the pins are broken out. It seems they are special.
When I redid my dts and only enabled ehrpwm1 & 2 and then recompiled dtb and rebooted.
FreeBSD seemed to relabel old ehrpwm1 to ehrpwm0 because that is disabled now.
[This is typical behavior of FreeBSD to give a zero address to the first detected device. vga0 comes to mind on headless units with no VGA connector.]
I didn't like that as the pin locations on the board are well documented as ehrpwm1A&1B and ehrpwm2A&2B.
So I added it back ehrpwm0 to get my names back to norm. I did leave off eCAP as I wont need it for now.

Now I need to verify if the pinmux is needed by checking for output from pins. Wish I had an oscilloscope.
 
Ok I worked on this tonight and I have built an overlay for PWM on BBB FreeBSD >11
Save this text as /boot/dtb/pwm.dts
Code:
/* Beaglebone enable PWM on FreeBSD 11 */
/dts-v1/;
/plugin/;

/ {
    compatible = "ti,beaglebone", "ti,beaglebone-black", "ti,beaglebone-green";


    fragment@0 {
        target = <&epwmss0>;
        __overlay__ {
            status = "okay";
        };
    };

    fragment@1 {
        target = <&ehrpwm0>;
        __overlay__ {
            status = "okay";
        };
    };

    fragment@2 {
        target = <&ecap0>;
        __overlay__ {
            status = "okay";
        };
    };

    fragment@3 {
        target = <&epwmss1>;
        __overlay__ {
            status = "okay";
        };
    };

    fragment@4 {
        target = <&ehrpwm1>;
        __overlay__ {
            status = "okay";
        };
    };

        fragment@5 {
                target = <&ecap1>;
                __overlay__ {
                        status = "okay";
                };
        };

    fragment@6 {
        target = <&epwmss2>;
        __overlay__ {
            status = "okay";
        };
    };

    fragment@7 {
        target = <&ehrpwm2>;
        __overlay__ {
            status = "okay";
        };
    };

    fragment@8 {
        target = <&ecap2>;
        __overlay__ {
            status = "okay";
        };
    };
};

Now from the /boot/dtb directory compile this dts as an overlay: dtc -I dts -O dtb pwm.dts -o pwm.dtb

Add an entry in /boot/loader.conf
Code:
fdt_overlays="pwm.dtb"
No kernel driver is needed. Just reboot. Tested this on FreeBSD 11.1 images from the FreeBSD site.

If you prefer to build into your source tree the file that the settings are located in is usr/src/sys/gnu/dts/arm/am33xx.dtsi
 
I enabled the eCAP pins as well. After getting to know some of the mux modes I see how they can be used now.
Same with PWM0A and PWM0B. They are not assigned to pins but can be. Checkout P9_21 and P9_22 mux mode 3.
To use these you need an additional overlay to change the pin state from default mode.
Thats were this guys site excels. He has the hex codes needed for each pin which is a nice shortcut.
http://www.kilobaser.com/blog/2014-07-28-beaglebone-black-devicetreeoverlay-generator
MuxModes is where you find the additional PWM pins. Not all pins have the PWM option.
The overlay that is created will not compile. It will need work. It does give you a good start.
 
To use these you need an additional overlay to change the pin state from default mode.
You don't need an additional overlay, you can include those pins state description by adding another fragment in your current overlay.
For example, for the mentioned P9.21 an P9.22 you can add the following:
Code:
    fragment@00 {
        target = <&am33xx_pinmux>;
        __overlay__ {
            ehrpwm0_AB: pinmux_ehrpwm0_AB {
                pinctrl-single,pins = <
                    0x154 0x03 /* P9.21 */
                    0x150 0x03 /* P9.22 */
                >;
            };
        };
    };
Also, you can use the spreadsheet from this page (most likely you already have seen it) for the modes and offsets.
 
I already mentioned in another thread this great collection of overlays by Robert Nelson. They can be build by simply running gmake.
The good thing is you can use various macros instead of trying to figure out modes/offsest/pullups etc. For instance:
Code:
            bb_uart1_pins: pinmux_bb_uart1_pins {
                pinctrl-single,pins = <
                    BONE_P9_24 (PIN_OUTPUT | MUX_MODE0) // uart1_txd.uart1_txd
                    BONE_P9_26 (PIN_INPUT | MUX_MODE0)  // uart1_rxd.uart1_rxd
                >;
            };
 
I was too lazy to create a Makefile from scratch since I use Robert Nelson's project as an "IDE" because it has useful macros etc.
So I simply remove all original .dts files from src/arm (actually move them and keep as reference) and copy my .dts files in src/arm.
Then I run gmake in the project's root directory.
 
Using that method the official W1 overlay for Onewire works on FreeBSD.
BB-W1-P9.12-00A0.dtbo
Code:
owc0: <FDT GPIO attached one-wire bus> at pin 28 on gpiobus1
ow0: <1 Wire Bus> on owc0
ow_temp0: <Advanced One Wire Temperature> romid 28:ff:a8:08:70:16:04:91 on ow0
ow_temp1: <Advanced One Wire Temperature> romid 28:ff:4e:51:70:16:05:c2 on ow0


I did what you said but ran gmake on /src/arm overlays before copying them out of the directory.
Just for kicks I decided to see what official Linux dtbo's would work.
So now I have these overlays working together. ADC,PWM,RTC,OneWire. I modified BB-RTC to work for me.
fdt_overlays="BB-ADC-00A0.dtbo,am33xx_pwm-00A0.dtbo,ds3231.dtb,BB-W1-P9.12-00A0.dtbo"
I added in the onewire drivers and also ds3231 driver with KERNCONF device additions.
Recompiled the kernel using a 32GB microSD card natively on BBB.

I am messing with a momentary push button switch on GPIO pins for a "Direction" button for PWM motor drive rotation.
Also doing an "Enable" button for some PWM motor control manual inputs.
Set Pins as input and pullup. Getting "0" when button depressed. Normally state="1".
So That worked easier than expected.
 
hi guys,

I finally had a few days free and some more machines to experiment with.

I tried to get PWM working following the very useful posts of Phishfry and aragats
but still, i am not successful.

I recap what I did.

1] I am running FreeBSD-11.1 in BB-Black

2] I composed the dts
Code:
----------- /boot/dtb/pwm.dts -------------------------
/* Beaglebone enable PWM on FreeBSD 11 */                                                                                                              
/* preso da: https://goo.gl/v5eFZm   */                                                                                                                
                                                                                                                                                       
/dts-v1/;                                                                                                                                              
/plugin/;                                                                                                                                              
                                                                                                                                                       
/{
    compatible = "ti,beaglebone", "ti,beaglebone-black";


    fragment@0 {
        target = <&epwmss0>;
        __overlay__ {
            status = "okay";
        };
    };

    fragment@1 {
        target = <&ehrpwm0>;
        __overlay__ {
            status = "okay";
        };
    };

    fragment@2 {
        target = <&ecap0>;
        __overlay__ {
            status = "okay";
        };
    };

    fragment@3 {
        target = <&epwmss1>;
        __overlay__ {
            status = "okay";
        };
    };

    fragment@4 {
        target = <&ehrpwm1>;
        __overlay__ {
            status = "okay";
        };
    };

        fragment@5 {
                target = <&ecap1>;
                __overlay__ {
                        status = "okay";
                };
        };

    fragment@6 {
        target = <&epwmss2>;
        __overlay__ {
            status = "okay";
        };
    };

    fragment@7 {
        target = <&ehrpwm2>;
        __overlay__ {
            status = "okay";
        };
    };

    fragment@8 {
        target = <&ecap2>;
        __overlay__ {
            status = "okay";
        };
    };

    /* per associare i pin P9.21 e P9.22 */
    fragment@00 {
        target = <&am33xx_pinmux>;
        __overlay__ {
            ehrpwm0_AB: pinmux_ehrpwm0_AB {
                pinctrl-single,pins = <
                    0x154 0x03 /* P9.21 */
                    0x150 0x03 /* P9.22 */
                >;
            };
        };
    };

};
----------------------------------

3] I compiled it with

dtc -O dtb -o pwm.dtbo -@ pwm.dts


4] I managed to get the overly loaded at boot with
Code:
---------- /boot/loader.conf ------------
fdt_overlays="pwm.dtbo"
--------------------------------------------------------

5] After system boots i see in dmesg output:
Code:
....
am335x_pwmss0: <AM335x PWM> mem 0x48300000-0x4830000f on simplebus0
am335x_ecap0: <AM335x eCAP> mem 0x48300100-0x4830017f irq 67 on am335x_pwmss0
am335x_ehrpwm0: <AM335x EHRPWM> mem 0x48300200-0x4830027f on am335x_pwmss0
am335x_pwmss1: <AM335x PWM> mem 0x48302000-0x4830200f on simplebus0
am335x_ecap1: <AM335x eCAP> mem 0x48302100-0x4830217f irq 68 on am335x_pwmss1
am335x_ehrpwm1: <AM335x EHRPWM> mem 0x48302200-0x4830227f on am335x_pwmss1
am335x_pwmss2: <AM335x PWM> mem 0x48304000-0x4830400f on simplebus0
am335x_ecap2: <AM335x eCAP> mem 0x48304100-0x4830417f irq 69 on am335x_pwmss2
am335x_ehrpwm2: <AM335x EHRPWM> mem 0x48304200-0x4830427f on am335x_pwmss2
.....

5] Now come problems, I try to set up the pwm on P9.21 but running
the following code I don't get any signal. Pin is flat 0.
Code:
#> sysctl dev.am335x_ehrpwm.0.period=1000
#> sysctl dev.am335x_ehrpwm.0.dutyA=500

Am i missing some important step ?
I admit i am not fully understanding what i am doing.

Bye
Nicola
 
Duty of 500 is not a good setting. You need to think of this as your throttle.
It takes values of 0-100 percent. You can slightly overdrive but best stay at <100.
You adjust the frequency and period.
The frequency and period are linked somewhat.
 
When I first tried PWM I used a R/C Car steering servo. I didn't realize it was only 270 degree range of motion.
It would go all the way one direction, lockup and I thought I was doing it wrong.

Frustrated I hooked up a LED and used that for PWM intro. If you use too fast a frequency, the LED glows solid.
So it takes some playing with. This for a flashing LED.
Then I recommend moving on to fading a LED with PWM. That is where you will see where 'duty' comes into play.
LED full on =100, LED off =0. I just wrote some cheezy scripts to fade up and down. Programmaticly would be nice.
The more steps the smoother the fade.
Those Arduino 37 Sensor kits have some nice LED's for messing with PWM. Multicolor fades are possible.
 
Last edited:
Phishfry, to be true i am quite surprised dutyX must be used as a throttle.
Anyhow, i tried, no luck. I am using a Digilent Analog Discovery 2 to test the state of my pins, i see no signal unfortunately.

I will try to understand a bit more deeper, it is really a messy subject.
 
I think of DUTY as duty cycle.
In electrical equipment 'Standby duty cycle' means part time use operations, whereas 'Continuous duty cycle' are full time.
Are you sure your using the right channel. There is an dutyA and dutyB.
You can have two independently running motors on one PWM but they both use the same frequency and period but an independent duty setting. Frequency and cycle seem tied together either by a ratio or mathematically. I never figured that part out.

I will revisit this and see what I did. All the parts are still spewed on my bench. I worked up to motors, then moved on.
New in boxes I have giant 2000oz. stepper and Gecko single channel motor driver and 300W 72V power supply.
I have no idea what to build with it at this time.
When the time comes I will be ready.

I started by using ENABLE and ROTATION signals from the BBB GPIO pins on a smaller test motor controller.
Didn't want to fry my pricey Gecko. Most motor controllers require these signals. in addition to PWM.
I used a small battery as well for signal testing ENABLE and ROTATION button functions on the drive controllers before I used GPIO power..
 
Phishfry , I got it working ! Hurray !
... i was toggling dutyA instead of dutyB, silly me;)

Motors are uberfun stuff, I tried only with little ones by now, and only from Linux. But I tried all the 3 DC macro-cathegories: Servo-Stepper-PlainVanilla. From node.js in Linux no problem, all fine. The objective for me is to have the same stuff working in FreeBSD.

Ok, let's become techincal, I got how the frequency/period stuff works.
Have a comfortable seat and a coke or a cigarette;)

*] When I boot the machine I get this configuration by default in FreeBSD-11.1
Code:
root@beaglebone:~ # sysctl dev.am335x_ehrpwm.0
dev.am335x_ehrpwm.0.dutyB: 0
dev.am335x_ehrpwm.0.dutyA: 0
dev.am335x_ehrpwm.0.period: 1000
dev.am335x_ehrpwm.0.freq: 100000
dev.am335x_ehrpwm.0.clkdiv: 1

*] Now, I set dutyB to the values [100, 200, 500]. What I get in my oscilloscope is attached here, with files names "period-1000-butyB-[100,200,500]-clkdiv-1.png".

*] From the figures we can see that dutyB=100 ==> UP.signal for 1 mico-sec,
dutyB=200 ==> UP.signal for 2 micro-sec, dutyB=500 ==> UP.signal for 5 micro-sec.

*] From this we conclude that the unit of measurement used in dutyB is 10 nano-seconds.
[from the trivial equation : 500 * unknownUnit = 5 micro-sec ]

*] From the definition of frequency then
Freq [Hz] = 1 / Period [seconds]
Then, period by default is 1000, but in units of 10 nano-sec =>
1000 * 10 ns = 10^-5 s
=> Freq = 10^5 Hz = 100_000
Gut ! It corresponds to our freq toggle =>
We can state that at least frequency toggle is specified in a standard unit of measurement.

*] PROBLEM. At this point I tried to generate a 10 Hz signal, wich i used one month ago to control a stepper motor.
Code:
sysctl dev.am335x_ehrpwm.0.freq=10
==> the command is rejected by my system.

*] Then i tried to make another kind of signal with a little higer frequency, i.e.
50 Hz with half wave up.

The procedure is this:
Code:
sysctl dev.am335x_ehrpwm.0.freq=50
The command is accepted by the system, and observe that
clkdiv now has become 32. The unit of measure in toggle period
and dutyB is no more 10 ns.

To have half wave up I do the following, I read the period toggle
Code:
sysctl dev.am335x_ehrpwm.0.period   # ===>  62500
and i set the dutyB to half of that value
Code:
sysctl dev.am335x_ehrpwm.0.dutyB=31250

What I have is exactly the wave i wanted !
See figure in attach "fullSignal-50hz-halfWaveUp.png"

Ciao
 

Attachments

  • period-1000-butyB-100-clkdiv-1.png
    period-1000-butyB-100-clkdiv-1.png
    200.8 KB · Views: 379
  • period-1000-duty-500-clkdiv-1.png
    period-1000-duty-500-clkdiv-1.png
    167.9 KB · Views: 353
  • period-1000-dutyB-200-clkdiv-1.png
    period-1000-dutyB-200-clkdiv-1.png
    162.4 KB · Views: 373
  • fullSignal-50hz-halfWaveUp.png
    fullSignal-50hz-halfWaveUp.png
    159.8 KB · Views: 422
Back
Top