Hello folks! 
In this tutorial I'll show you how to install and run BlissOS (an Android-x86 based OS) with bhyve.
Table of contents
PART 1
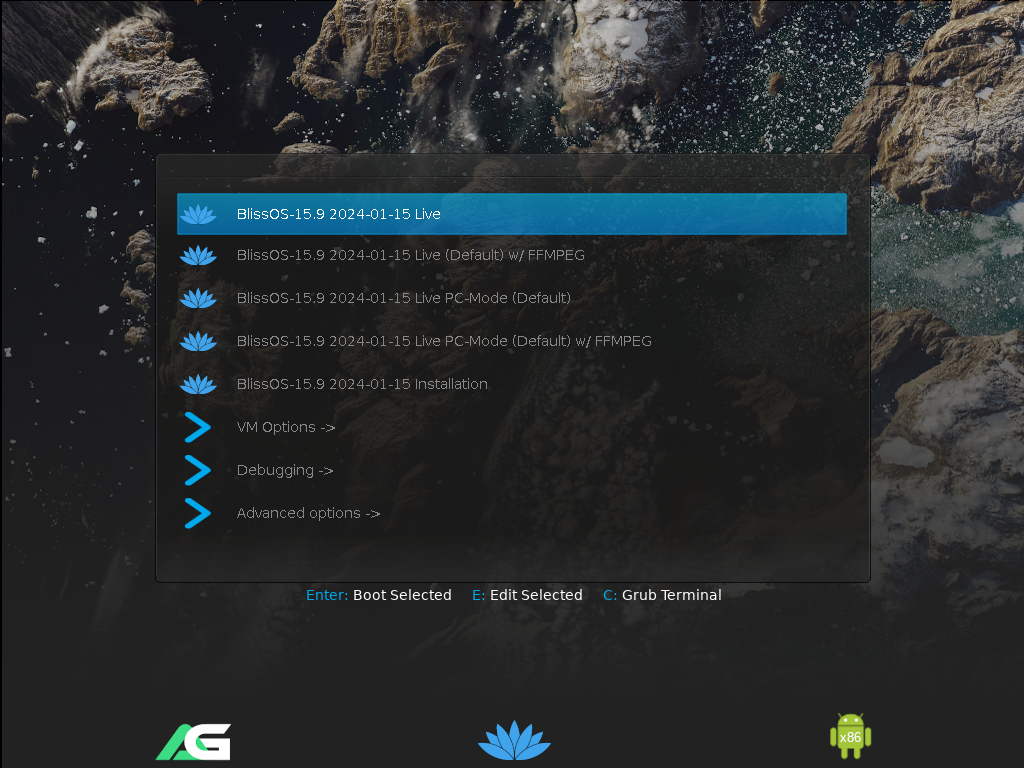
Here the bootloader welcome us with the various boot options. What interest us is the 5th entry: "Installation":

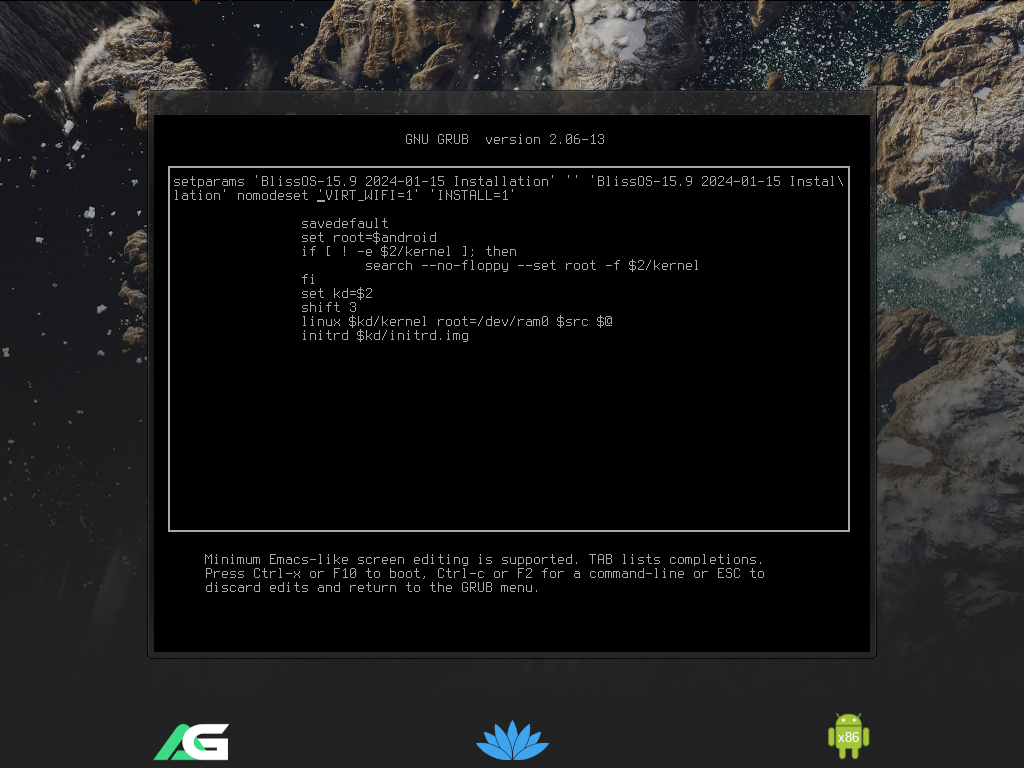
However, we can't boot that entry directly: we must edit it.

We must add two options to the setparams line: nomodeset and VIRT_WIFI=1

This options will be automatically added to the GRUB entries when the OS will be installed; we won't need to add them manually.
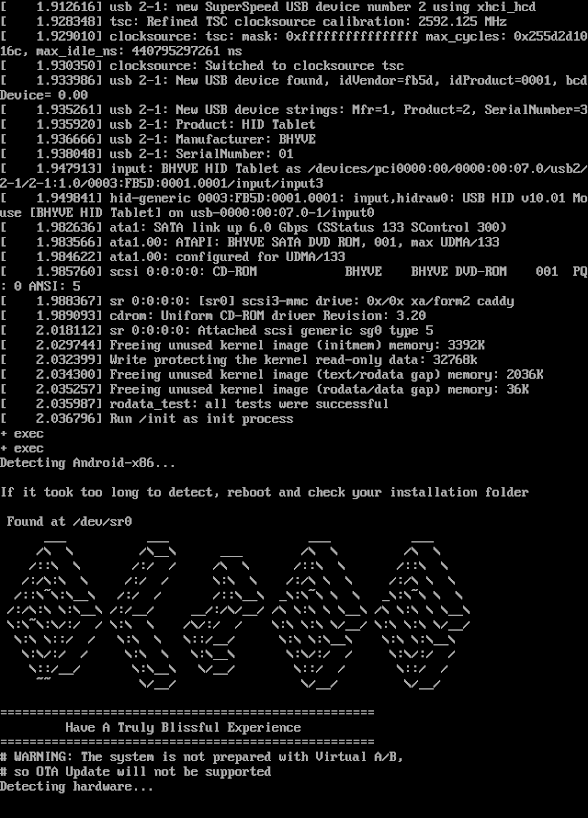
This is how the boot process looks like:

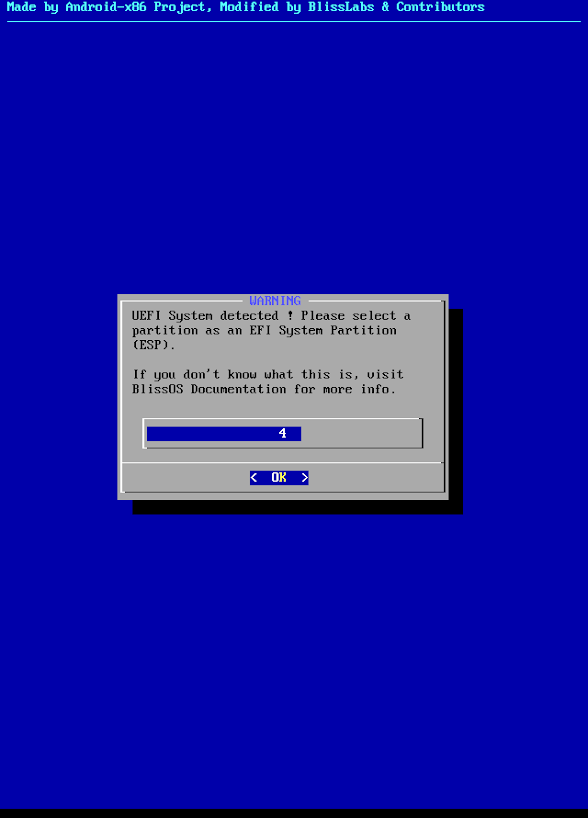
It'll take some time detecting the hardware, then the installer will start:

In this tutorial I'll show you how to install and run BlissOS (an Android-x86 based OS) with bhyve.
Table of contents
- Reasoning
- Requirements
- Software used
- Installation
- Post-install steps
- Setup a new installation
- Migrate a VirtualBox VM
- Conclusion
PART 1
- Reasoning
Even if Android (in its x86-64 port) is supported by bhyve and it's simple to boot a live Android-x86 OS with bhyve, there are some details worthy of attention when installing it. That's why I'm writing this how-to, since I didn't find a unique source to address them entirely.
- Requirements
First of all, your PC should support bhyve: check the wiki page for more informations.
Then you need to download the iso of the version you want to install. From BlissOS site you can choose which one download. I'll use Bliss OS 15.9.x (x86_64-v2) with GApps in this tutorial because it's the newest that is not in beta stage.
- Software used
I used sysutils/vm-bhyve as my VM manager, and net/tigervnc-viewer as VNC client.
- Preliminary steps
If this is the first time you use vm-bhyve, there are some preliminary steps to enable and configure it. Let's start by enabling it (and bhyve support too) in /etc/rc.conf:
Code:
vm_enable="YES"
vm_dir="<path to the directory/ZVOL which will host your VMs>"
vmm_load="YES"
This will set things up for vm-bhyve: needed directories will be created and required kernel modules will be loaded.
Code:
# vm initNow it's time to configure a virtual switch that will let the associated VMs to connect to the internet. And here we have two choices:
- Bridge
- NAT
By default, bridging is used, BUT it won't work if your computer use a wireless interface. In that case NAT is required.
We'll start by showing the bridge-based setup:
Code:
# vm create switch public
# vm switch add public <your interface name>
Here we created a new virtual switch named public, and assigned an interface to it. You can create as much virtual switch you want, and name them as you please. It's just up to how you want things to be organized.
Now let's see how to configure NAT: here things are more complex, since to use NAT we have to enable the host to act as a gateway, and a firewall will be responsible for the NAT itself. The wiki have instructions for both static IP configuration and for DHCP; I'll report here the steps described to set things up with a static IP address and using PF as firewall, since is what I use. To configure DHCP instead, you can check the wiki page. If you prefer another firewall and/or program for DHCP you will have to adapt the wiki instructions.
Now, let's enable the host to act as a gateway and PF in /etc/rc.conf
Code:
gateway_enable="YES"
pf_enable="YES"
We create a rule for NAT in /etc/pf.conf and one to permit traffic from the VMs to the internet; I choose the described 192.168.8.x network for my VM:
Code:
nat on <interface name> from {192.168.8.0/24} to any -> (<interface name>)
pass in quick from {192.168.8.0/24} to any
Now, if you don't want to reboot, enable IP forwarding and PF this way:
Code:
# sysctl net.inet.ip.forwarding=1
# service pf start
Note: net.inet.ip.forwarding will be enabled automatically on the next boot because we enabled the gateway functionalities; there is no need to put it in /etc/sysctl.conf
Very well, now that the host is ready for NAT, let's setup vm-bhyve:
Code:
# vm switch create -a 192.168.8.1/24 public     <-- if creating a new switch
# vm switch address public 192.168.8.1/24       <-- if you already have a switch you want to use
# vm switch list
NAME    TYPE      IDENT  ADDRESS         PRIVATE  MTU  VLAN  PORTS
public  standard  -      192.168.8.1/24  no       -    -     -
Done! We can now start the installation process!
- Installation
First of all, let's create a new VM. I didn't use a specific template, just the default one. We'll modify it immediately afterwards.
Code:
# vm create BlissOS
# vm configure BlissOS
And this is how my BlissOS.conf looks like:
Code:
loader="uefi"
cpu=2
memory=4096M
network0_type="virtio-net"
network0_switch="public"
disk0_type="virtio-blk"
disk0_name="disk0.img"
uuid="<Here will be the unique id of your VM>"
network0_mac="<Here will be the MAC address of the VM network interface>"
graphics="yes"
graphics_port="5900"
graphics_res="<Put your VM resolution here (don't chose a resolution smaller than 640x480)>"
graphics_wait="yes"
xhci_mouse="yes"
bhyve_options="-s 10,hda,play=/dev/dsp,rec=/dev/dsp"
Now that the VM is ready installation can begin: let's boot this thing!
Code:
# vm install BlissOS <path to the iso image file>
$ vncviewer 0:5900However, we can't boot that entry directly: we must edit it.
We must add two options to the setparams line: nomodeset and VIRT_WIFI=1
This options will be automatically added to the GRUB entries when the OS will be installed; we won't need to add them manually.
This is how the boot process looks like:
It'll take some time detecting the hardware, then the installer will start:
