
Last update on Sep 3, 2018.
Step 1 - Device list:
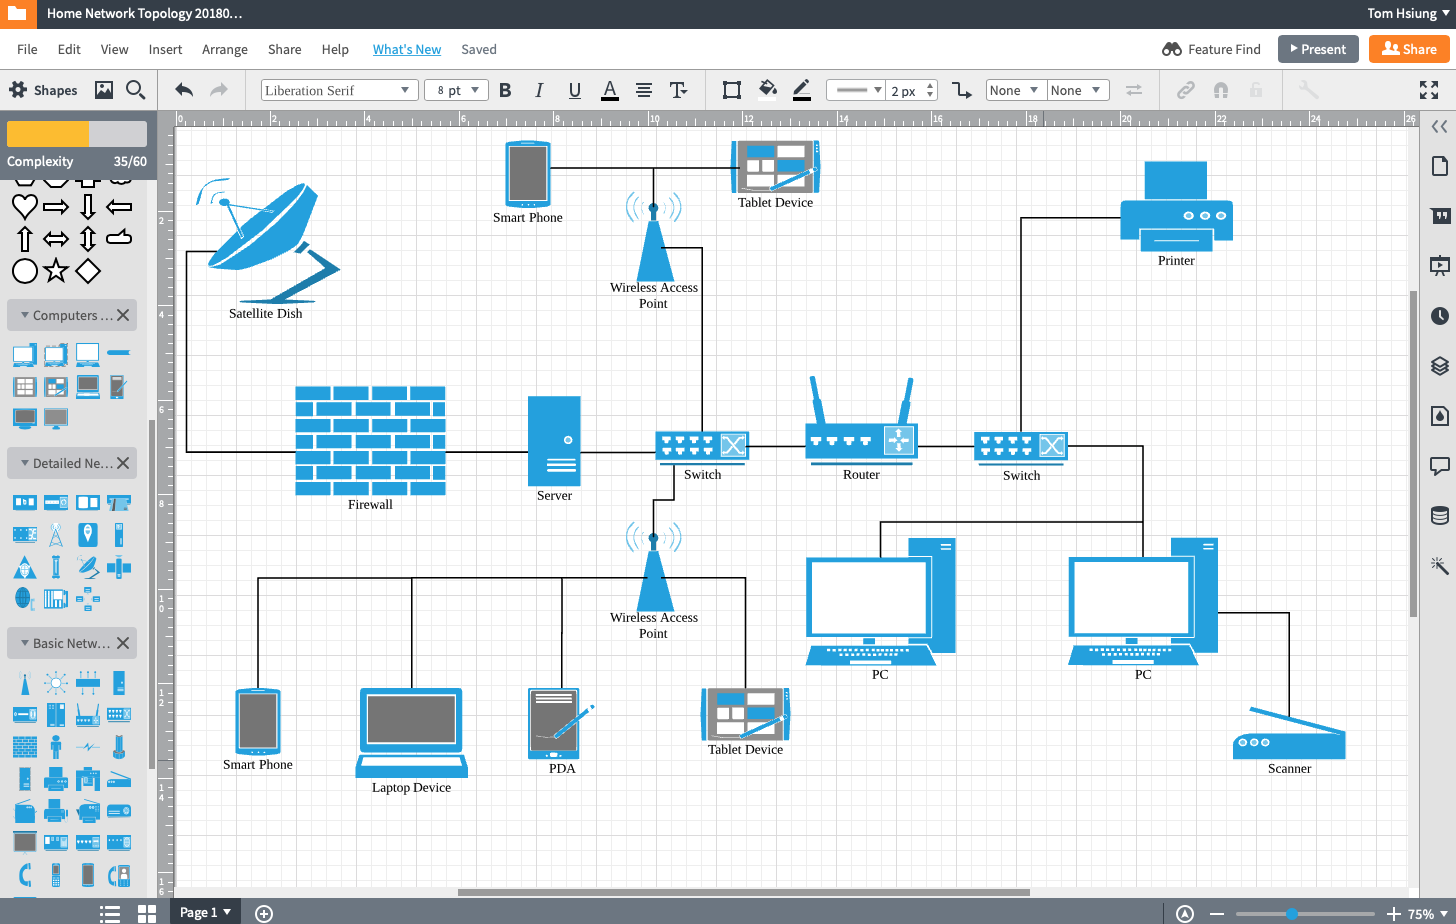
After trying for several times, I drew the network topology.

Step 3 - Dynamic DNS
After these settings are properly configured, your servers' domain and its public IP are mapped.

<string>-e</string>
<string>-f</string>
<string>/etc/pf.conf</string>
There is no way to check the NAT table of a home TP-Link router. However, you can do so if your router is also a PC. For example,
Just type this in your command line application:

The local area private network is divided into two subnets. Subnet 1 is a class A private network (first 4 bits of binary IP address: 0000). Subnet 2 is a class B private network (first 4 bits of binary IP address: 1000).
Basic (and easy) binary knowledge is required to compute IP address and mask.
Finished.
Step 1 - Device list:
- Hosts
- Windows PC x 1
- Mac Pro x 1
- Mac mini x 1 (as a server, which has two 10/100/1000 Mbps ethernet network interfaces)
- Mac laptop x 1
- iPad x 2
- iPhone x 2
- Android mobile x 1
- Network printer x 1
- Network cores
- Router x 1
- Mac Mini x 1 (as packets forwarding device / router)
- Switch x 1
- AP x 2
- Wireless repeater x 2
After trying for several times, I drew the network topology.
Step 3 - Dynamic DNS
After these settings are properly configured, your servers' domain and its public IP are mapped.
- You must purchase a registered domain from a domain provider
- A software that check your public IP address (dynamic via PPPoE from my ISP) information and update your domain's DDNS records.
- I use a purchased (5 dollars) app called dDNS broker.
- dDNS broker has a dummy guide for set it up.
- screenshot:
- Add DNS recourse records to your domain via your domain provider's website
- A + DDNS record for your web server, server, and mail servers
- Example:
- www.toms-therapeutics.site 30 IN A x.x.x.x
- server.toms-therapeutics.site 30 IN A x.x.x.x
- mail1.toms-therapeutics.site 30 IN A x.x.x.x
- mail2.toms-therapeutics.site 30 IN A x.x.x.x
- Example:
- MX record for your mail server
- Example:
- toms-therapeutics.site 30 IN MX 0 mail1.toms-therapeutics.site
- toms-therapeutics.site 30 IN MX 1 mail2.toms-therapeutics.site
- Example:
- A + DDNS record for your web server, server, and mail servers
- To turn on the packets forwarding function, type in terminal:
Code:
sysctl -w net.inet.ip.forwarding=1 - To automatically turn on packets forwarding function on boot
- Create file /private/etc/sysctl.conf
- Edit /private/etc/sysctl.conf file by pico editor and add this line,
Code:
net.inet.ip.forwarding=1
- NAT - The Mac has built-in NAT configuration. The only thing you need to do is to enable the PF (packet flitering) function. You can enable it by pf
. But after rebooting you have to enable it again, unless you modify /System/Library/LaunchDaemons/com.apple.pfctl.plist file by addingCode:
pfctl -e:Code:-e
<string>-e</string>
<string>-f</string>
<string>/etc/pf.conf</string>
There is no way to check the NAT table of a home TP-Link router. However, you can do so if your router is also a PC. For example,
Just type this in your command line application:
Code:
pfctl -ss- Port fowarding - You have to add port forwarding rule manually.
- create a file (rule1) by pico editor at /private/etc/pf.anchors/rule1
- add lines for port forwarding rules into rule1
- Example:
-
Code:
rdr pass on en0 inet proto tcp from any to any port 40080 -> 192.168.1.1 port 80 -
Code:
rdr pass on en1 inet proto udp from any to 127.0.0.1 port 40443 -> 192.168.1.2 port 443
-
- Example:
- Edit the /private/etc/pf.conf file and add line
Code:
rdr-anchor "rule1" - Edit the /private/etc/pf.confi file and add line
Code:
load anchor "rule1" from "/etc/pf.anchors/rule1"
The local area private network is divided into two subnets. Subnet 1 is a class A private network (first 4 bits of binary IP address: 0000). Subnet 2 is a class B private network (first 4 bits of binary IP address: 1000).
Basic (and easy) binary knowledge is required to compute IP address and mask.
- Subnet 1
- Mac mini
- Ethernet network interface 1
- IP address: x.x.x.x (PPPoE from ISP)
- Remove DNS servers if possible
- Ethernet netowrk inferace 2
- IP address: 10.0.0.1
- Mask: 255.255.255.192.0 (classless mask)
- IP range: 10.0.0.1 to 10.0.0.62, and 10.0.0.63 is broadcast IP address
- Subnet network ID: 10.0.0.0
- Function as a DHCP server, configured via macOS server app
- DHCP configuration
- DHCP server IP: 10.0.0.1
- Mask: 255.255.255.192
- DHCP IP range: 10.0.0.4 to 10.0.0.61
- DHCP configuration
- Function as a (local) DNS server, configured via macOS server app
- It is used to send DNS queries and their replies.
- It is not used to provide DNS replies to DNS queries from WAN, at least in this thread.
- The forward DNS server configuration should be blank. By this, this local DNS server sends DNS queries directly to the root DNS server (sounds great).
- In this care, theoretically the DNS query packets evoked by hosts within the LAN would reach the ethernet network interface 2 and later be transformed by the Mac mini and send to World root DNS server from ethernet network interface 2.
- Route table (Mac mini)
- Rule 1
- Destination: 10.0.0.0
- Genmask: 255.255.255.192
- Next hop: 0.0.0.0 (delivery directly)
- Rule 2
- Destination: 0.0.0.0
- Genmask: 0.0.0.0
- Next hop: x.x.x.x (depends on ISP)
- Rule 3
- Destination: 172.0.0.32
- Genmask: 255.255.255.2234
- Next hop: 10.0.0.62
- Rule 1
- Ethernet network interface 1
- Switch
- Just physically connect it. It is a layer 2 device so you don't need to configure it (it has not layer 3 so it has no IP address).
- Although the switch itself could extract MAC address, itself does not have MAC address. However, it is still a layer 2 device.
- Access point 1
- IP address: 10.0.0.2
- Mask: 255.255.255.192
- Router: 10.0.0.1
- DNS server: 10.0.0.1
- In theory, a wireless access point is as the same as a switch, except its wireless function. So you guys might ask why the access point has layer 3 function (because it has an IP address). The explain is that the AP would function as a switch well, no matter if it has only layer 2 or more. The reason it has layer 3 or even layer 4, layer 5 is that this makes us be able to manage it via application layers, like http protocol.
- Access point 2
- IP address: 10.0.0.3
- Mask: 255.255.255.192
- Router: 10.0.0.1
- DNS server 10.0.0.1
- Other thing: same as above
- Wireless mobile devices: e.g., smart phones, tablets, laptops
- IP configured via DHCP service.
- Mac mini
- Router 2 / bridge between subnet 1 and subnet 2
- WAN (connected to subnet 1) configuration
- IP address: 10.0.0.62
- mask: 255.255.255.192
- Router: 10.0.0.1
- DNS server: 10.0.0.1
- LAN (connected to subnet 2) configuration
- IP address: 172.0.0.62
- mask: 255.255.255.224, I would like to set a different mask compared with subnet 1, just for researching and experiment.
- IP range: 172.0.0.33 to 172.0.0.62, and 172.0.0.63 is the broadcast IP address.
- Subnet network ID: 172.0.0.32
- DHCP configuration
- DHCP server IP: 172.0.0.62
- Mask: 255.255.255.224
- DHCP IP range: 172.0.0.34 to 172.0.0.61
- DNS server: 10.0.0.1
- NAT function enabled by default (it really is a router, not a PC, TP-Link TL-R473GP-AC)
- Port forwarding function enabled by default (its called "virtual servers")
- The router has one WAN port and four LAN ports. You could think it combines a router and a switch.
- Route table for router 2
- Rule 1 (for packets in)
- Destination: 172.0.0.32
- Genmask: 255.255.255.224
- Next hop: 0.0.0.0 (delivery directly)
- Rule 2 (for packets out)
- Destination: 0.0.0.0
- Genmask: 0.0.0.0
- Next hop: 10.0.0.1
- Rule 1 (for packets in)
- WAN (connected to subnet 1) configuration
- Windows PC and other hosts (e.g., printer, Mac Pro, iMac)
- IP address: 172.0.0.34
- Mask: 255.255.255.224
- Router: 172.0.0.62
- DNS server: 10.0.0.1
- If you want your hosts within the subnet 2 to be accessed from Internet, you need a function called "port forwarding". In my case, I have two routers between Internet and subnet 2, so I have to set up "double" port forwarding function. I don't know if this would work.
- The NAT function on router 2 could be turned off in theory, as both subnet2 are private. However, I don't know how to turn it off as it is by default enabled and I cannot delete it.
- The process of DNS querying possibly will change. Commonly, there is only one router between Internet and home LAN. The host send the DNS query packet to router (gateway) at the LAN network interface, and then the router transfer this packet to WAN network interface. Finally the WAN network interface sends the DNS query packet to the DNS server which is pre-configured by your ISP. In my case above, both hosts in subnet 1 and subnet 2 send DNS queries to the DNS server (Mac mini) at the ethernet network interface 2. Later, the Mac mini process these DNS query packets and send them to the World root DNS name server(s), via the ethernet network interface 1. As you can see, the pre-configured (local) DNS server by your ISP (usually via PPPoE) are not used in this way.
Finished.
Last edited: