Installing FreeBSD on an old tablet

I don't know wether this is the correct place to ask this question, but I'm really stuck and help would be much appreciated.

I have an old tablet in which I want to install FreeBSD. Currently it has Android installed and CWM recovery. I'm pretty sure that FreeBSD is compatible with the Allwinner A10 SoC that the tablet incorporates, and also the Realtek RTL8188CUS Wi-Fi module. I should also clarify that I don't expect my tablet to work as a mobile phone. I just want to be able to use the display, Wi-Fi and a keyboard (Even if the display is not supported, the board has a Micro HDMI port).

As the A10 has a Cortex-A8 processor inside and should have the capability to boot from SD, I decided to burn the FreeBSD-14.0-RELEASE-arm-armv7-GENERICSD.img image into a Micro SD card hoping to be able to boot the system directly from there, without success booting the system directly from there. I also tried with an USB drive with similar results. I guess It's also impossible to develop an Android ROM, as FreeBSD isn't a Linux distro.

In short, I need a way to boot directly from the SD card, as the CWM recovery can't change the boot order.
Maybe I should get another bootloader?
 
https://ghostbsd-arm64.blogspot.com/2021/05/audit-your-boot-files-with-md5deep.html

I am thinking about your situation, so as to NOT write a dumb answer to your great question. FreeBSD Foundation back in April 2022 selected to make Arm64 a Tier 1 supported architecture and Raspberry Pi 4B was one of the hardware boards they supported. They use the Raspi4B firmware to boot from the ESP EFI FAT32 GPT partition that has the standard raspi4b files and config.txt , startx4.elf , fixup4.dat files. There is one file bootline.bin or u-boot.bin that searchs for and boots file /boot/kernel/kernel that starts FreeBSD. So make a small document about the files on your ESP Android parition and their sha256sum checksums. (This is to know when the file changes and is or is not the file you were looking for ) m5deep or hashdeep utilities help with that. Collect your files that boot your present Android O/S. Save them in your development environment directory. Run Md5deep to document what version is what. What has changed from your booting system.

Next if you find what the name is off the file that gets called to boot the Android Linux Kernel, You could make/add a couple directories in that image /boot /boot/kernel , then place and rename a copy of file /boot/kernel/kernel from that FreeBSD image to be same name as the Android Linux image. Yes you will have faults and missing items, but should get you closer to a booting SD card image. Fred. You should have 3 minimum partitions on that test mcroSD card:
1.) ESP EFI GPT partition of 50 Megabyte or 260 Megabyte or larger of Type 0700 msdosfs
2.) FreeBSD-Swap partition 1 Gbyte, 2Gbyte, or 500Mbyte you choose. Type A502 Freebsd-swap ,
3.) Freebsd-ufs type A501 or a freebsd-zfs type A503, of 30-300GB size

RTL8188CUS is a good wifi chip set that boots with the two freebsd files if_rtwn.ko & if_rtwn_usb.ko files that are located in directory /boot/kernel/modules. Here is the manual wifi bring up for that chipset. You are welcome to contact me here or via Direct Message or email. I will be excited to see you boot FreeBSD on that tablet.
https://ghostbsd-arm64.blogspot.com/2023/11/arm64-boot-usb-flash-drive-hey-buddy.html
https://ghostbsd-arm64.blogspot.com/2023/11/creating-ghost14-aarch64-arm64-boot.html Klara Systems Document is very good to read and understand. Trying to give you a minimal amount of resouces to make progress without overloading you with TOO MANY details. Development is starting with a minimal set of working pieces and adding one piece at a time. First get a working booting ESP GPT partition FAT16 or FAT32. Then use that armv7 image and create a directory path same as the present booting Android Linux file. Check that it calls & boots that present Android Linux kernel file. Then substitue with this single file /boot/kernel/kernel or kernel.img. Ask more questions, we can answer them. I am sure I left a confusing path of words here. I might make a diagram picture of booting FreeBSD and place here.


https://forums.ghostbsd.org/viewtopic.php?f=64&t=526 I wrote this several years ago, cause I had problems using NetworkMgr tool to boot on my X86_64 Laptop. Edit 3 files and then issue some manual commands to connect to the Wifi access point. First a USB to 3.3V ttl serial port connection to the primary UART console port. Then after wifi is working, using SSH is a good tool for development. JTAG tool recommended is FLIRC Jeff Probe with the USB to UART serial port inteface for the console.
https://flirc.tv/products/flirc-jeffprobe?variant=43085036585192
 
4 commands to use when exploring a FreeBSD file system:
Code:
camcontrol devlist
geom dev list
gpart status
gpart show -lp

gpart list


root@Ghost14-selfbuilt-rpi4B-nginx-tst1:/usr/local/etc # gpart status
Name Status Components
da0p1 OK da0
da0p2 OK da0
da0p3 OK da0
root@Ghost14-selfbuilt-rpi4B-nginx-tst1:/usr/local/etc # gpart show -lp
=> 40 1953525088 da0 GPT (932G)
40 2008 - free - (1.0M)
2048 6291456 da0p1 efibootarm (3.0G)
6293504 1761607680 da0p2 zfs (840G)
1767901184 16777216 da0p3 swap (8.0G)
1784678400 168846728 - free - (81G)

root@Ghost14-selfbuilt-rpi4B-nginx-tst1:/usr/local/etc # gpart list
Geom name: da0
modified: false
state: OK
fwheads: 255
fwsectors: 63
last: 1953525127
first: 40
entries: 128
scheme: GPT
Providers:
1. Name: da0p1
Mediasize: 3221225472 (3.0G)
Sectorsize: 512
Stripesize: 4096
Stripeoffset: 0
Mode: r1w1e1
efimedia: HD(1,GPT,a234812d-1862-11ee-8e93-dca632d53d76,0x800,0x600000)
rawuuid: a234812d-1862-11ee-8e93-dca632d53d76
rawtype: c12a7328-f81f-11d2-ba4b-00a0c93ec93b
label: efibootarm
length: 3221225472
offset: 1048576
type: efi
index: 1
end: 6293503
start: 2048
2. Name: da0p2
Mediasize: 901943132160 (840G)
Sectorsize: 512
Stripesize: 4096
Stripeoffset: 0
Mode: r1w1e1
efimedia: HD(2,GPT,4bd2b728-1864-11ee-8e93-dca632d53d76,0x600800,0x69000000)
rawuuid: 4bd2b728-1864-11ee-8e93-dca632d53d76
rawtype: 516e7cba-6ecf-11d6-8ff8-00022d09712b
label: zfs
length: 901943132160
offset: 3222274048
type: freebsd-zfs
index: 2
end: 1767901183
start: 6293504
3. Name: da0p3
Mediasize: 8589934592 (8.0G)
Sectorsize: 512
Stripesize: 4096
Stripeoffset: 0
Mode: r1w1e1
efimedia: HD(3,GPT,7cccc4ed-1864-11ee-8e93-dca632d53d76,0x69600800,0x1000000)
rawuuid: 7cccc4ed-1864-11ee-8e93-dca632d53d76
rawtype: 516e7cb5-6ecf-11d6-8ff8-00022d09712b
label: swap
length: 8589934592
offset: 905165406208
type: freebsd-swap
index: 3
end: 1784678399
start: 1767901184
Consumers:
1. Name: da0
Mediasize: 1000204886016 (932G)
Sectorsize: 512
Stripesize: 4096
Stripeoffset: 0
Mode: r3w3e6

MORE EXAMPLES:

root@Ghost14-selfbuilt-rpi4B-nginx-tst1:/usr/local/etc # camcontrol devlist
<Samsung SSD 870 QVO 1TB 4103> at scbus0 target 0 lun 0 (da0,pass0)
root@Ghost14-selfbuilt-rpi4B-nginx-tst1:/usr/local/etc # geom disk list
Geom name: da0
Providers:
1. Name: da0
Mediasize: 1000204886016 (932G)
Sectorsize: 512
Stripesize: 4096
Stripeoffset: 0
Mode: r3w3e6
descr: Samsung SSD 870 QVO 1TB
lunname: Samsung SSD 870 QVO 1TB 333457EBD0F2
lunid: 3033345752406200
ident: 333457EBD0F2
rotationrate: unknown
fwsectors: 63
fwheads: 255

root@Ghost14-selfbuilt-rpi4B-nginx-tst1:/usr/local/etc # gpart status
Name Status Components
da0p1 OK da0
da0p2 OK da0
da0p3 OK da0

Was already mounted at /mnt/esp on my raspberry pi 4b hardware:
root@Ghost14-selfbuilt-rpi4B-nginx-tst1:/usr/local/etc # mount -t msdosfs /dev/da0p1 /mnt/esp
mount_msdosfs: /dev/da0p1: Device busy
root@Ghost14-selfbuilt-rpi4B-nginx-tst1:/usr/local/etc # mount | grep da0
/dev/da0p1 on /mnt/esp (msdosfs, local)

root@Ghost14-selfbuilt-rpi4B-nginx-tst1:/usr/local/etc # cd /mnt/esp
root@Ghost14-selfbuilt-rpi4B-nginx-tst1:/mnt/esp # ls -l
total 23808
-rwxr-xr-x 1 root wheel 5888 Jun 22 2023 armstub8-gic.bin
-rwxr-xr-x 1 root wheel 5888 Jun 22 2023 armstub8.bin
-rwxr-xr-x 1 root wheel 26894 Mar 3 2021 bcm2710-rpi-2-b.dtb
-rwxr-xr-x 1 root wheel 29011 Mar 3 2021 bcm2710-rpi-3-b-plus.dtb
-rwxr-xr-x 1 root wheel 28392 Mar 3 2021 bcm2710-rpi-3-b.dtb
-rwxr-xr-x 1 root wheel 26890 Mar 3 2021 bcm2710-rpi-cm3.dtb
-rwxr-xr-x 1 root wheel 49090 Mar 3 2021 bcm2711-rpi-4-b.dtb
-rwxr-xr-x 1 root wheel 52456 Mar 3 2021 bootcode.bin
-rwxr-xr-x 1 root wheel 37 Feb 25 21:36 cmdline.txt
-rwxr-xr-x 1 root wheel 1746 Jul 3 2023 config_august12.txt
-rwxr-xr-x 1 root wheel 1851 Jan 19 05:48 config_feb24.txt
-rwxr-xr-x 1 root wheel 1867 Feb 19 03:57 config_February19.txt
-rwxr-xr-x 1 root wheel 221 Jul 3 2023 config_june22.txt
-rwxr-xr-x 1 root wheel 1912 Feb 27 02:16 config.txt
-rwxr-xr-x 1 root wheel 1746 Sep 19 2023 config.txt.orig
-rwxr-xr-x 1 root wheel 177 Jul 3 2023 config.txt.original
drwxr-xr-x 1 root wheel 32768 Jun 22 2023 dtb
drwxr-xr-x 1 root wheel 32768 Jun 22 2023 EFI
-rwxr-xr-x 1 root wheel 3187 Mar 3 2021 fixup_cd.dat
-rwxr-xr-x 1 root wheel 10298 Mar 3 2021 fixup_db.dat
-rwxr-xr-x 1 root wheel 10298 Mar 3 2021 fixup_x.dat
-rwxr-xr-x 1 root wheel 7314 Mar 3 2021 fixup.dat
-rwxr-xr-x 1 root wheel 5448 Mar 3 2021 fixup4.dat
-rwxr-xr-x 1 root wheel 3187 Mar 3 2021 fixup4cd.dat
-rwxr-xr-x 1 root wheel 8452 Mar 3 2021 fixup4db.dat
-rwxr-xr-x 1 root wheel 8454 Mar 3 2021 fixup4x.dat
-rwxr-xr-x 1 root wheel 1594 Mar 3 2021 LICENCE.broadcom
drwxr-xr-x 1 root wheel 32768 Jun 22 2023 overlays
-rwxr-xr-x 1 root wheel 240 Jun 22 2023 README
-rwxr-xr-x 1 root wheel 793116 Mar 3 2021 start_cd.elf
-rwxr-xr-x 1 root wheel 4794472 Mar 3 2021 start_db.elf
-rwxr-xr-x 1 root wheel 3704808 Mar 3 2021 start_x.elf
-rwxr-xr-x 1 root wheel 2952960 Mar 3 2021 start.elf
-rwxr-xr-x 1 root wheel 2228800 Mar 3 2021 start4.elf
-rwxr-xr-x 1 root wheel 793116 Mar 3 2021 start4cd.elf
-rwxr-xr-x 1 root wheel 3722504 Mar 3 2021 start4db.elf
-rwxr-xr-x 1 root wheel 2981192 Mar 3 2021 start4x.elf
-rwxr-xr-x 1 root wheel 568960 Oct 21 2021 u-boot.bin
-rwxr-xr-x 1 root wheel 602552 Jun 22 2023 u-bootJune22_broken.bin
root@Ghost14-selfbuilt-rpi4B-nginx-tst1:/mnt/esp #
 
As far as I know, there is not an Android phone / tablet in existence which you can install a standard OS on.

I think the closest attempt was https://postmarketos.org/ but really that is just using the Android kernel with a Alpine linux chroot.
 
As far as I know, there is not an Android phone / tablet in existence which you can install a standard OS on.

I think the closest attempt was https://postmarketos.org/ but really that is just using the Android kernel with a Alpine linux chroot.
It depends on the device, postmarketOS is targeted to run linux mainline kernel, and not the android one. Some devices doesn't permit this tho, but that's is on the manufacturer locking things up.
 
To do this need's to have a different bootloader. The only one I know that has a chance of working is Das U-Boot: https://en.wikipedia.org/wiki/Das_U-Boot, and is needed to check if Das U-Boot should be support hardware. Because CWM checks Android before uploading and is dedicated to loading Android. Uploading a new bootloader requires analyzing the chips on the device's motherboard, finding the chips that contain the bootloader and finding the appropriate pins that enable uploading the new bootloader via JTAG/RS232 or a similar interface. using the "spider" method or a programmer if possible. Searching for chip numbers in its documentation, the so-called datascheet and looking for information about pins and the possibility of uploading anything in it. As for the operating system, the fact that it is available and it says that it works does not mean that it works. You need to prepare a working .img image in advance, copy it to the target disk, and somehow connect it and tie the laces to Das U-Boot to make it load.
 
Last edited:
I might make a diagram picture of booting FreeBSD and place here.
I would really appreciate that, if you don't mind, as I'm not very familiar with overall ARM's boot process.

JTAG tool recommended is FLIRC Jeff Probe with the USB to UART serial port inteface for the console.
https://flirc.tv/products/flirc-jeffprobe?variant=43085036585192
This, by the way, is exactly what I've been looking for for some time now. I'll buy it and hope it arrives soon, as I don't think I'll be able to allow USB debugging on my android device (it lacks the touch screen and only has the LCD).

Good news are that there is a clearly labled UART port and it shows some data when connected to my oscilloscope, so I guess it's open.
 
To do this need's to have a different bootloader. The only one I know that has a chance of working is Das U-Boot
I'll take a look at it!!
Searching for chip numbers in its documentation, the so-called datascheet and looking for information about pins and the possibility of uploading anything in it.
I'd already read some parts of that datasheets for the components, and thankfully they are all publicly available as it's a board from 2012. The memory consists of two NAND flash, and I believe they are interpreted as an SD card, as that's how they show up when looking into CWM's recovery menu.

I didn't find any candidate pins to be a JTAG connector, but I found two UART ports and at least one of them appears to be open. Maybe I can try loading U-Boot after opening a shell on that UART.
 
Since you can look around at directories and partitions
fdisk -l
parted
gdisk /dev/sda
print

gpt or mbr scheme for partitions?
on primary FAT 16 or FAT32 ESP EFI partition look for default boot directories
la -l /EFi
ls -l /EFI/BOOT/bootaa64.efi
ls -l /EFI/refind/bootaa64.efi

mkdir -p /EFI/freebsd
cp -p /boot/loader.efi /EFI/freebsd/bootaa64.efi


The bootloader should look for, load , and jump to execute bootaa64.efi file image

Yes, this is a start. please share these details and ask more questions.


look for aarch64 information.
 
UPDATE:

I've managed to open a console on one of the UARTs with an Arduino I had laying around, it was pretty simple. When powered on, the board prints all the boot and kernel messages through that port.

The boot process seems to be as follows:
1.- The boot process starts with "Boot0", which after reading the A10's datasheets, seems to be loaded from a ROM inside the SoC.
2.- Boot0 searches in the NAND flash for the file head of Boot1, checks that it's correct and jumps to it.
3.- Boot1 inits and mounts a FAT16 filesystem in the flash, and launches "BootMain". Then it seems to load a kernel (I suppose U-Boot).
4.- After all that, U-Boot is launched, showing some data from the system and listing the fastboot partitions.
5.- A message is shown that says: "Hit any key to stop autoboot: 0". That means that I can't stop the autoboot process from loading Android's kernel from the NAND.

When the boot process ends, I'm able to execute some Android commands, and when I enter sh, I even get a message telling me I'm root. I've already tested ls, mount, cat and mv and they work. But the shell seems to be very basic, as I don't have grep or cp, for example.

I think the next step I'll take is getting a U-Boot console so that I can manage from where to boot. Then I'll be able to start developing a FreeBSD bootable image from the microSD card.
 
fdisk -l
parted
gdisk /dev/sda
print
I can only use print, all the other commands results in a not found error.

la -l /EFi
ls -l /EFI/BOOT/bootaa64.efi
ls -l /EFI/refind/bootaa64.efi
This is the / directory:
Code:
root@android:/ # ls -al / 
drwxr-xr-x root     root              2010-01-01 02:49 acct 
drwxrwx--- system   cache             2010-01-01 10:31 cache 
dr-x------ root     root              2010-01-01 02:49 config 
lrwxrwxrwx root     root              2010-01-01 02:49 d -> /sys/kernel/debug 
drwxrwx--x system   system            2010-01-01 02:43 data 
-rw-r--r-- root     root          116 1970-01-01 01:00 default.prop 
drwxr-xr-x root     root              2010-01-01 02:50 dev 
lrwxrwxrwx root     root              2010-01-01 02:49 etc -> /system/etc 
-rwxr-x--- root     root       102840 1970-01-01 01:00 init 
-rwxr-x--- root     root         2344 1970-01-01 01:00 init.goldfish.rc 
-rwxr-x--- root     root        18445 1970-01-01 01:00 init.rc 
-rwxr-x--- root     root         2662 1970-01-01 01:00 init.sun4i.rc 
-rwxr-x--- root     root         2230 1970-01-01 01:00 init.sun4i.usb.rc 
-rwxr-x--- root     root      3145728 1970-01-01 01:00 initlogo.rle 
drwxrwxr-x root     system            2010-01-01 02:49 mnt 
dr-xr-xr-x root     root              1970-01-01 01:00 proc 
drwx------ root     root              2012-04-02 05:27 root 
drwxr-x--- root     root              1970-01-01 01:00 sbin 
lrwxrwxrwx root     root              2010-01-01 02:49 sdcard -> /mnt/sdcard 
drwxrwxrwx root     root              2010-01-01 02:50 sdtest 
drwxr-xr-x root     root              2010-01-01 02:49 sys 
drwxr-xr-x root     root              2010-01-01 02:43 system 
-rw-r--r-- root     root          272 1970-01-01 01:00 ueventd.goldfish.rc 
-rw-r--r-- root     root         3825 1970-01-01 01:00 ueventd.rc 
-rw-r--r-- root     root         1076 1970-01-01 01:00 ueventd.sun4i.rc 
lrwxrwxrwx root     root              2010-01-01 02:49 vendor -> /system/vendor

look for aarch64 information.
Also, the processor of this SoC has a 32bit architecture.
 
U-Boot was copied in place of the Android bootloader? And what model of this tablet it is?

Uboot bootloader is located in an invisible memory area from the operating system level, possibly even from CWM. And perhaps in a separate chip. The messages may be similar to Andrid but it is not android because in my opinion it should not download it because in my opinion there is no OS bootloader defined in U-Boot (not to be confused with hardware bootloader(U-Boot) (not to be confused with silicon logic)). Or something was loaded "by accident". And if it is loaded, it should load in its fll entirety. From what is written here, I conclude that Uboot boots correctly. In my opinion is needed to wait for the selfload procedure to complete, and then look for the option of manually entering the system bootloader, this time the bootloader located in the operating system. And since it says that you can run some commands from Android, what does the uname -a command say?

On Unix like systems, additional bootloader files are usually located in a directory or partition mounted under /boot.

Edit:
The order in which Android is loaded into memory usually looks like this:

Silicon logic: This is the first step in booting up a device, where an integrated circuit (often called a "chipset") initiates the boot process.

Bootloader: Once the silicon logic is initialized, control passes to the bootloader. A bootloader is software that allows a device to load its operating system. In many cases, the bootloader is responsible for booting alternative operating systems, restoring the system from a backup, installing custom ROMs, etc.

Recovery (e.g. CWM - ClockworkMod Recovery): It is not always necessary to load system recovery. However, if the user chooses to enter recovery mode (e.g. via a key combination on the device), control transitions to system recovery. CWM (ClockworkMod Recovery) is one of the popular system recovery tools that allows users to perform operations such as restoring backups, installing custom ROMs, etc.

Android System: Once the bootloader or system recovery has finished its tasks, control moves on to load the main operating system, i.e. Android. At this point the device is ready for use.

So the correct order is:

Silicon Logic > Bootloader > Recovery (Optional) > Android
By ChatGPT.
Maybe U-Boot just loaded the console from CWM (Recovery) or whatever they called it. And whether U-Boot supports this silicon.

Edit2:
In fact, you can flash the bootloader via UART. However, the method of uploading the bootloader via the UART interface is a bit more complicated compared to other programming methods, such as JTAG or SPI.

Typically, the bootloader is loaded via UART via serial communication using appropriate software or programming tool. In this process, the microcontroller or integrated circuit that is the target device must be configured to listen for data coming through the UART port and write it to the appropriate memory areas where the bootloader is located.

One of the challenges of this process is to ensure the correct configuration of both sides of communication (sender and recipient) and appropriate data management so that the bootloader data is sent and saved in the right place in the target device's memory.

For more complex integrated circuits, such as microcontrollers equipped with JTAG or SWD (Serial Wire Debug) programming interfaces, it may be preferable to use these interfaces for bootloader programming due to their more advanced features, speed and stability. However, for simpler circuits, UART can still be used for this purpose, although it may be less efficient compared to other programming methods.

Edit3:
Before uploading the system, should be checked the operation of the system on a "development board" with this processor to see if it works properly on this architecture. Like Cubieboard.

 
Last edited:
U-Boot was copied in place of the Android bootloader? And what model of this tablet it is?
It certainly looks like that, and the tablet is a Gemei G9 from 2012.

This is an extract from the boot messages, where you can see Boot0, Boot1 and U-Boot:
Code:
HELLO! BOOT0 is starting! 
boot0 version : .3.0 
dram size =1024 
Succeed in opening nand flash. 
Succeed in reading Boot1 file head. 
The size of Boot1 is 0x00036000. 
The file stored in 0X00000000 of block 2 is perfect. 
Check is correct. 
Ready to disable icache. 
Succeed in loading Boot1. 
Jump to Boot1. 
[       0.135] boot1 version : 1.3.0 
[       0.136] pmu type = 3 
[       0.163] axi:ahb:apb=2:2:2 
[       0.163] set dcdc2=1300, clock=768 successed 
[       0.165] key 
[       0.178] no key found 
[       0.178] flash init start 
[       2.871] flash init finish 
[       2.873] fs init ok 
[       2.874] fattype FAT16 
[       2.874] fs mount ok 
[       2.880] script finish 
[       2.881] power finish 
[       2.886] BootMain start 
[       2.886] 0 
[       2.900] usbdc_vol = 4000, usbdc_cur = 900 
[       2.900] usbpc_vol = 4000, usbpc_cur = 0 
[       2.903] init to usb dc 
[       2.906] usb power found 
[       2.908] usb start detect 
[       2.911] usb enter detect 
[       2.914] USB Device!! 
[       2.972] usb irq 0x00000001 
[       2.993] pre sys mode 
[       2.993] startup status = -1 
[       2.993] power start detect 
[       2.996] power enter detect 
[       3.000] key value = -1 
[       3.002] recovery key high 6, low 4 
[       3.005] unable to find fastboot_key key_max value 
[       3.013] test for multi os boot with display 
[       3.119] usb set pc, 0x00000004 
[       3.590] WRN:L149(OSAL/OSAL_De.c):Length is ZERO! 
[       3.641] show pic finish 
[       3.641] load kernel start 
[       3.656] load kernel successed 
[       3.656] start address = 0x4a000000 
[       3.657] power exit detect   
 
U-Boot 2011.09-rc1-00000-g783bb1b-dirty (Apr 06 2012 - 22:13:16) Allwinner Technology  
 
CPU:   SUNXI Family 
Board: A10-EVB 
DRAM:  512 MiB 
NAND:  2912 MiB 
In:    serial 
Out:   serial 
Err:   serial 
--------fastboot partitions-------- 
-total partitions:9- 
-name-        -start-       -size-       
bootloader  : 100000        1000000      
env         : 1100000       200000       
boot        : 1300000       2000000      
system      : 3300000       18000000     
data        : 1b300000      80000000     
misc        : 9b300000      100000       
recovery    : 9b400000      2000000      
cache       : 9d400000      10000000     
UDISK       : ad400000      8c00000      
----------------------------------- 
Hit any key to stop autoboot:  0  
 
NAND read: device 0 offset 0x1300000, size 0x2000000 
 33554432 bytes read: OK 
 
Starting kernel ...

After that, you can see the following kernel messages with information from the system, as uname -a is also disabled:
Code:
[    0.000000] Linux version 3.0.8 (lzy@lzy-desktop) (gcc version 4.5.1 (Sourcery G++ Lite 2010.09-50) ) #85 PREEMPT Fri Apr 6 22:13:04 CST 2012 
[    0.000000] CPU: ARMv7 Processor [413fc082] revision 2 (ARMv7), cr=10c53c7f

I feel like this might be a very complex or even impossible task with an Arduino... I'm planning on buying an UART programmer and also JTAG for future projects, as wb7odyfred suggested.

So, right now my biggest concern is to be able to modify U-Boot's settings, as I believe that interrupting the booting process (by setting "Hit any key to stop autoboot" to 1), would result with some luck in an U-Boot shell, and I would be able to boot from the MicroSD card.
My problem is how to edit those files, as as you said they are in an hidden part of the memory for the operative system and as I've now tested, also for CWM. Is there any way to directly write into the memory using UART? And is this risky?
 
UART logged into the Recovery console. Since you didn't flash U-Boot, it looks like Google is using it too. But it is almost certainly modified, because Android does not allow to install an Android family other than the one dedicated to this specific model Tablets/Smartphones. Not to mention a different operating system. What chip is the Bootloader physically stored in? In the same place as Recovery + Android, on the dedicated partition. Or in a small other chip?
 
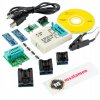
When I said programmer, I meant a EEPROM programmer that would allow to save the bootloader in its rightful place externally by unsoldering the integrated circuit with bootloader, uploading the bootloader through the programmer and soldering it back. Is needed to know the EEPROM Chip model in order to select a programmer/programming method. There are also exist programmers for externally uploading files to NAND memory.


EEPROM_PROGRAMMER.jpg
 
Back
Top